PS: It's never too late to decide to start.
Spring Boot is used to simplify the development of Spring applications, reducing unnecessary configuration processes. Its main features include Spring Boot Starter, auto-configuration, command-line interface, Actuator, etc. As an Android developer, learning Spring Boot will focus on practical usage, with all articles based on corresponding cases. This article will introduce how to use Spring Boot to develop an interface from the following aspects:
- Spring Boot Project Initialization
- Creating a Spring Boot Project using IDEA
- Spring Boot Project Directory Structure
- Brief Introduction to POM File
- Implementing a Simple Interface
- Interface Testing
Spring Boot Project Initialization#
Creating a Spring application starts with Spring Initializr, which allows for quick selection of project dependencies. You can access https://start.spring.io/ to create a Spring application, as shown in the image below:
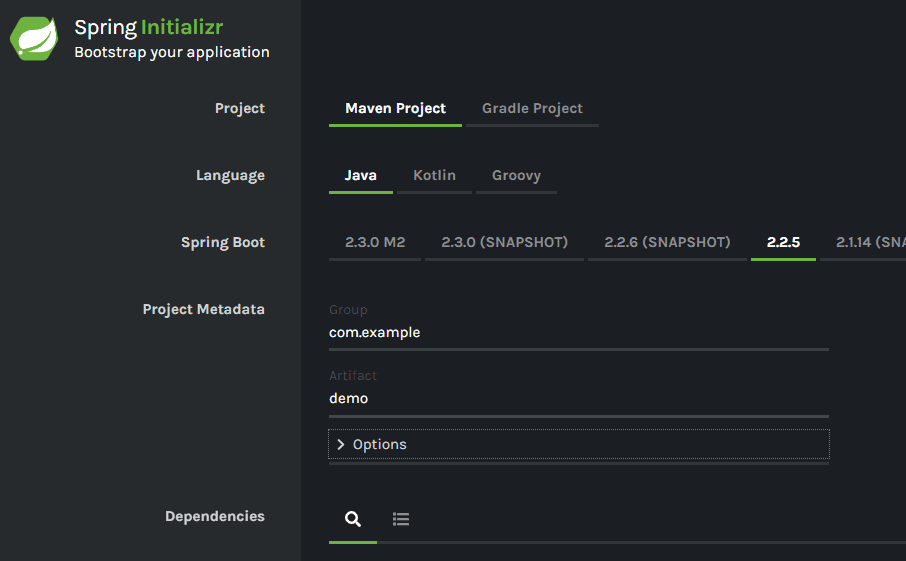
By configuring, you can generate the corresponding configuration information project source package, which can be opened using IntelliJ IDEA or other IDEs.
Creating a Spring Boot Project using IDEA#
The most common way is to use an IDE to create Spring-related projects. Here, we choose IntelliJ IDEA to create a Spring Boot project.
Step 1: Select File->New->Project, as shown below:
Step 2: Choose Spring Initializr, with Project SDK at least JDK 1.8, then select Next:
Step 3: Configure the project information according to the project settings, then select Next:
Step 4: Select Web->Spring Web and the version of Spring Boot. This step actually adds dependencies for web development support to the project, which will be visible in the pom file later. Then select Next:
Step 5: Select Finish to complete the project creation:
Spring Boot Project Directory Structure#
The main directory structure of a Spring Boot project is as follows:
│ pom.xml
└─src
    ├─main
    │  ├─java
    │  │  └─com
    │  │      └─manu
    │  │          └─hello
    │  │                  SpringBootHelloWorldApplication.java
    │  │
    │  └─resources
    │      │ application.properties
    │      │
    │      ├─static
    │      └─templates
    └─test
        └─java
            └─com
                └─manu
                    └─hello
                            SpringBootHelloWorldApplicationTests.java
The main directories and files are described as follows:
- pom.xml: The dependency configuration file based on Maven for the project. If the project is based on Gradle, there will be a corresponding Gradle file.
- src/main/java: The source code directory of the project.
- src/main/resources: The resource file directory.
- src/test: The test file directory.
- application.properties: The configuration file, which can also be configured using a yml file.
- static: The static resource file directory, such as HTML, CSS, JS, etc.
- templates: The template file directory, such as Thymeleaf, etc.
- SpringBootHelloWorldApplication: The project startup class.
Brief Introduction to POM File#
POM stands for Project Object Model. Maven projects are configured through XML, and pom.xml is used to configure Maven projects. The pom.xml file is similar to the build.gradle file in Android development. Of course, Spring Boot projects can also be built using Gradle, mainly used to manage project dependencies and configure project information. Let's take a look at the content of the pom file for a Spring Web project:
<?xml version="1.0" encoding="UTF-8"?>
<project xmlns="http://maven.apache.org/POM/4.0.0"
    xmlns:xsi="http://www.w3.org/2001/XMLSchema-instance"
    xsi:schemaLocation="http://maven.apache.org/POM/4.0.0 https://maven.apache.org/xsd/maven-4.0.0.xsd">
    <!--pom model version -->
    <modelVersion>4.0.0</modelVersion>
    <!--parent project to inherit from-->
    <parent>
        <groupId>org.springframework.boot</groupId>
        <artifactId>spring-boot-starter-parent</artifactId>
        <version>2.2.5.RELEASE</version>
        <relativePath /> <!-- lookup parent from repository -->
    </parent>

    <!--project information-->
    <groupId>com.manu</groupId>
    <artifactId>spring-boot-hello-world</artifactId>
    <version>0.0.1-SNAPSHOT</version>
    <!--type of artifact produced by the project, default is jar, others include war, rar, ejb, ear, par, etc.-->
    <packaging>jar</packaging>
    <name>spring-boot-hello-world</name>
    <description>Spring Boot sample for Hello World!</description>

    <!--property settings-->
    <properties>
        <java.version>1.8</java.version>
    </properties>

    <!--dependencies-->
    <dependencies>
        <!--support for Web-->
        <dependency>
            <groupId>org.springframework.boot</groupId>
            <artifactId>spring-boot-starter-web</artifactId>
        </dependency>
        <dependency>
            <groupId>org.springframework.boot</groupId>
            <artifactId>spring-boot-starter-test</artifactId>
            <scope>test</scope>
        </dependency>
    </dependencies>

    <!--build-->
    <build>
        <!--plugins-->
        <plugins>
            <plugin>
                <groupId>org.springframework.boot</groupId>
                <artifactId>spring-boot-maven-plugin</artifactId>
            </plugin>
        </plugins>
    </build>
</project>
As for other specific configurations of the pom file, we will not delve into them here.
Implementing a Simple Interface#
According to the above steps, the project has been created. The project startup class is as follows:
@EnableAutoConfiguration
@ComponentScan
@Configuration
//@SpringBootApplication
public class SpringBootHelloWorldApplication {
    public static void main(String[] args) {
        // Start the application, including the Spring container, embedded Tomcat, etc.
        SpringApplication.run(SpringBootHelloWorldApplication.class, args);
    }
}
The @SpringBootApplication annotation is equivalent to using @EnableAutoConfiguration, @ComponentScan, and @Configuration together, mainly used to configure the startup class. Here, we will implement an interface based on this. First, create a MessageBean as the return entity class, as follows:
/**
 * @Desc: MessageBean
 * @Author: jzman
 * @Date: 2020/3/6 15:51.
 */
public class MessageBean {
    private long id;
    private String author;
    private String message;

    public MessageBean(long id, String author, String info) {
        this.id = id;
        this.author = author;
        this.message = info;
    }
    // ...
}
Then, create the corresponding controller class, where the @RestController annotation marks the class HelloWorldController as a controller. The methods inside this class will return objects instead of page views, equivalent to using @Controller and @ResponseBody together.
The returned MessageBean will be converted to json, and this process is automatically supported by Spring's HTTP message converters, ultimately using MappingJackson2HttpMessageConverter to convert the MessageBean object into the corresponding json format.
/**
 * @Desc: HelloWorldController
 * @Author: jzman
 */
//@Controller
//@ResponseBody
@RestController
public class HelloWorldController {

    private final AtomicLong counter = new AtomicLong();

//    @RequestMapping(value = "/message", method = RequestMethod.GET)
    @GetMapping("/message")
    public MessageBean message(@RequestParam(name = "author", defaultValue = "jzman") String author,
                               @RequestParam(name = "message", defaultValue = "Hello world!") String message) {
        return new MessageBean(counter.incrementAndGet(), author, message);
    }
}
@RestController is equivalent to using @Controller and @ResponseBody together, which converts the objects returned from the Controller into the corresponding format.
@Controller is responsible for class injection operations, which will not be explored in depth here. If you have used the Dagger framework in Android development, it may help understand the use of the @Controller annotation. @ResponseBody mainly indicates that the returned object should be converted into a specific format, with the default being json format.
@RequestMapping is used for address mapping and can be used on both classes and methods. If used on a class, all methods in that class responding to requests will have this as the parent path. If used on a method, it indicates the current response path. As shown in the code above, a GET request can be implemented using @RequestMapping, or @GetMapping. The @GetMapping actually defaults to specifying the request method as RequestMethod.GET. Additionally, @RequestParam is used to configure request parameters.
Interface Testing#
Run SpringBootHelloWorldApplication, and the successful run screenshot is as follows:
Access the following interface to view the returned data:
http://localhost:8080/message?author=jzman&message=Hello
The returned data is as follows:
{"id":3,"author":"jzman","message":"Hello"}
Thus, a simple interface has been implemented using Spring Boot, with the interface configuration method similar to Retrofit in Android development, allowing for easy configuration using annotations.